Tuesday, 5 March 2013
Tuesday, 26 February 2013
Sunday, 24 February 2013
Saturday, 23 February 2013
Shutter Speed Concept Illustrated
Shutter speed is the Measurement of the time the shutter is open, in seconds or fractions of a second. It is expressed as fractions of a second as 1 s, 1/2 s, 1/4 s … 1/250 s, 1/ 500 s. The faster the shutter speed, the shorter the time the image sensor is exposed to light and less is the exposure assuming rest all settings are same. Increasing shutter speed by one step halves the amount of time the shutter is open and vice verse.
Friday, 22 February 2013
Thursday, 21 February 2013
Wednesday, 20 February 2013
Tuesday, 19 February 2013
Aperture Concept Illustrated
Monday, 18 February 2013
Wednesday, 30 January 2013
Digital Zoom And Optical Zoom
Most cameras have both optical zoom and digital zoom. Optical zoom works just like a zoom lens on a film camera. The lens changes focal length and magnification as it is zoomed. Image quality stays high throughout the zoom range. Digital zoom simply crops the image to a smaller size, then enlarges the cropped portion to fill the frame again. Digital zoom results in a significant loss of quality as is clear from the examples below. It's pretty much a last resort, and if you don't have it in camera, you can do a similar job using almost any image editing program
Thursday, 24 January 2013
Wednesday, 23 January 2013
Monday, 21 January 2013
Different Types of Lights in Photography
1. Side Lighting
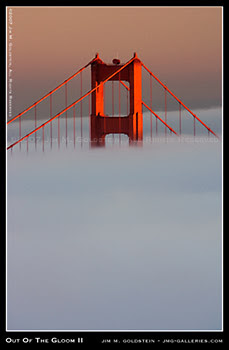
Side Lighting is when the lighting is coming from the side. This usually provides a great deal of contrast can create long shadows and adds depth to the image. This type of lighting can add a dramatic flair to architectural and portraiture photography.
2. Back Lighting
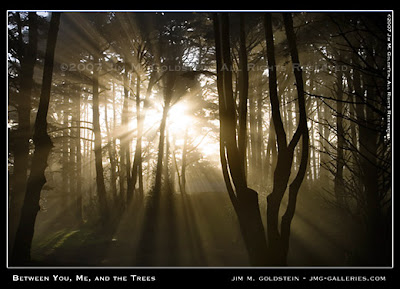
Back lighting is when light is behind your subject and is directed at you and your camera. This type of lighting creates silhouettes quiet easily. Combined with certain atmospheric conditions such as fog or airborne dust you can get dramatic lighting effect
3. Rim Lighting
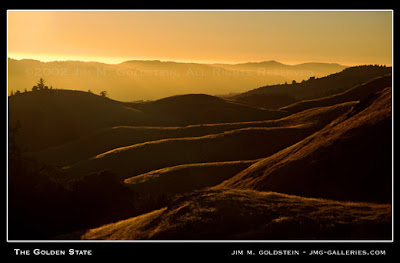
When light comes in at an acute angle it can create highlights along the edges of your subject. The stark contrast that it provides highlights shape and form. This type of lighting adds impact to macro, wildlife, nature and fine art photography.
4. Ambient Light
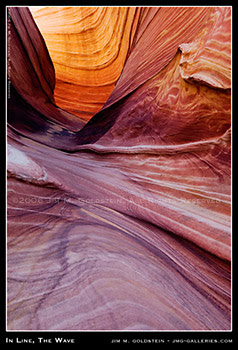
Ambient light is non-direct soft lighting that often is bounced from one surface to another. As a result of the non-direct lighting, brightness of your subject is lower than with other types of lighting. In fact this type of lighting often tricks people the most as we seldom think about it consciously. Most photographers might just ignore it looking for other types of lighting. Ambient light works well for a variety of photographic genres particularly landscape photography.
5. Soft or Diffuse Light

Soft light is diffuse providing lighting that is even. This type of lighting reduces contrast and minimizes shadows. Soft light is excellent for portraiture, macro, and nature photography.
6. Hard Light
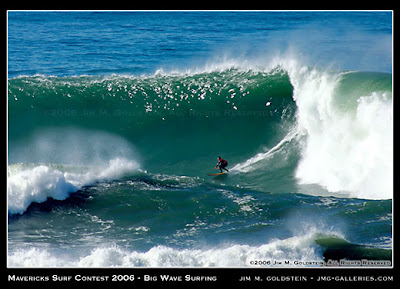
Hard light is quite direct and can often be intense in brightness. This type of lighting creates strong shadows and high contrast. Highlights can be quiet intense under Hard lighting conditions so special care should be made with ones exposure. Hard light can be stylistically applied to most any photographic genre, but for many eyes it can be less appealing than other types of lighting.
7. Spotlight
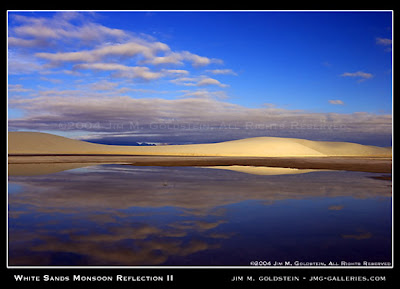
Very simply Spot Light is when a focused amount of light highlights a particular section of your subject or scene. This type of lighting can create strong shadows and contrast. Spot light can add dramatic impact to all genres of photography
8. Artificial Lighting
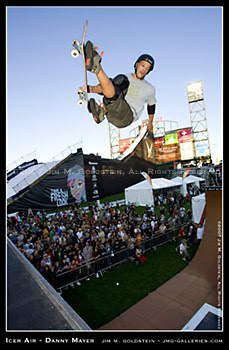
The most obvious type of lighting is Artificial lighting. This can be generated from a variety studio lights, and built in or external flash units. There are few genres of photography that Artificial lighting cannot be used successfully. Artificial lighting provides a lot of flexibility and creative opportunities.
9. Various Combinations of Lighting
Sunday, 20 January 2013
Thursday, 17 January 2013
Low Angle Shot
For capturing some typical dramatic photos, sometimes one has to take a low angle shot. For example, we see always see flowers at a ‘down’ angle and hence shooting them down won’t make the photo interesting. To make flowers look gorgeous, shoot them at their level.
Follow us for Photography tips, techniques and tutorials.
Follow us for Photography tips, techniques and tutorials.
Thursday, 10 January 2013
Minimalistic photography
Minimalistic
photography is about creating ‘empty’ spaces in the photograph, basically to
emphasis a subject, which is otherwise not occupying most of the space in the
frame. There is hardly any distraction in this category of photography, so that
the eye of the person looking at the image can’t help but be drawn to the main element.
Follow us for Photography tips, techniques and tutorials.
Follow us for Photography tips, techniques and tutorials.
Tuesday, 8 January 2013
Monday, 7 January 2013
Friday, 4 January 2013
White Balance
White balance is used to adjust colors to match the color of the light source so that white objects appear white. Subjects may be lit by a number of different light sources such as sunlight, incandescent bulbs, fluorescent lighting and it might affect the tone of the photograph.
In
DSLRs it is possible to adjust the white
balance to suit your light source, so that white looks white, not
yellow or blue. Normally there is an automatic setting and the camera decides
what white balance setting to use. However if you know what your light source
is you can usually set the camera to it and this may give better results. Most
digital cameras have settings for sunlight,
shade, electronic flash, fluorescent lighting and tungsten lighting. Some have a manual or custom setting where you point
the camera at a white card and let the camera figure out what setting to use to
make it white.
Follow us for Photography tips, techniques and tutorials.Thursday, 3 January 2013
Buying A DSLR - What Not To Look For
1. Don’t ask Canon or Nikon
Good photography has nothing to do with the label (brand) of your camera. Both Cannon and Nikon are market leaders and don’t be biased when someone says one is better than the other.
2. Megapixel
A photo taken in a 0.3 MP VGA camera and same with a 5MP camera can be distinguished easily. Similarly the sharpness of a photo taken with 5MP camera and a 10 MP camera has remarkable difference, but beyond 14 MP, there is hardly any distinguishable difference unless you are printing posters or cropping too much always. Hence don’t let just the Megapixel be a decisive feature while buying a DSLR camera.
3. Free Gift & Offers
Most of the camera stores may try to give lucrative gifts and offers to clear their inventory of obsolete models. Don’t buy a camera because you are getting some discount or free gift with it. Buying a DSLR is quite an investment and you need to do it judiciously.
4. Costly camera will make you a great photographer
A high end camera will make your job easy with extra features, but it is not going to take photos for you. It is the photographer in you who has to do this. You will anyways need to invest time and patience to understand and be comfortable with your camera.
5. Don’t spend much on camera body, Save for Lenses & Accessories
Gears, along with accessories play a very important role in Photography. Most of the times, it’s not the camera but the Lens which makes a great picture. If you are serious about photography, definitely you will need to buy extra lenses based on your category of interest (macro, telephoto, wide-angle). Hence, if you are on a tight budget, don’t spend much on Camera body rather save to buy lenses later.
Follow us for Photography tips, techniques and tutorials.
Follow us for Photography tips, techniques and tutorials.
Tuesday, 1 January 2013
Buying A DSLR - What to look for
If you want
to take photography as a profession or as a serious hobby, it’s recommended to
own a DSLR. While you are buying your first DSLR or upgrading it, spend some
time in doing research about the various options available and compare them. No
doubt, it’s an investment and you have to do it wisely so that you don’t have
to repent later.
There are
many features of DSLR, which would be mentioned in the catalog. It is absolutely
OK; if most of those jargons don’t make any sense to you. As a beginner, you
don’t have to know all the features, but there are few specifications which are
important and should be checked for comparing while taking the decision of
buying a DSLR camera.
1. Sensor size
Image sensor
is one of the most important parts of an SLR as it converts the light rays into
digital photograph. The clarity and sharpness of the photograph depends on it.
The photos taken in a DSLR looks far sharper than that of a point and shoot,
even if taken in auto mode because of bigger image sensor size.
Do check the
size of the image sensor before you buy your camera and if you have to compare
between few options, sensor size is one of the distinctive feature to compare
with.
2. Light
sensitivity
Light sensitivity
is used for noise control. It can be known from the range of ISO sensitivity
that a camera offers more the range, better is the noise control and sharper
are the pictures.
3. Lens focal
length
Entry level and
semiprofessional DSLRs come with a kit lens, which is an all-purpose lens to enable
amateurs click almost everything before they realize their specific interest and
collect the specific lenses. More the range of the kit lens more is the
learning opportunity.
Few DSLRs
offer the normal kit lens of 18-55 mm focal length and few offer the 18-105 mm
kit lens. If your budget permits, go for the camera which offers the higher
range of kit-lens.
4. Sensor
dust-removal system
As mentioned
earlier, sensor is one of the most important parts of a DSLR and it is very
delicate also, not to be touched often. Accumulated dust particles will affect
the picture quality and hence, do ensure that your camera has an automatic
sensor dust removal system before buying.
5. Frames per
second
As a
beginner, you might like to use your DSLR for occasional video recording also. Frames
per second are a measure of the video quality coming out of the DSLR. More the
frames per second, better is the video quality.
6. Focusing
method
There are
two things which come as a part of Focusing method.
The first
one is the number of Auto Focusing which the Camera points, which varies from 7
to 30 in various camera. More the number of focusing points means more option
to focus on a range of subjects in the frame. So, if budget permits, go for the
camera with more number of AF- points.
The second
one is the availability of focusing motor in the camera. High end and semiprofessional
DSLRs come with a focusing motor, in which you can use a low end lens which
does not have the autofocus feature and the camera will take care of Auto Focusing.
Lenses which have autofocus feature are costlier than lenses which does not
have the feature and hence if you have a high end DSLR (which has the Focusing
motor), you can use the low end lenses (which does not have the auto-focusing feature).
Again, the
DSLRs which have the focusing motor are bit costlier than the normal DLSRs. So
if you don’t have the budget for a high end camera now, you can go for a low
end DSLR and later on add the high end lenses to your gear-collection.
7. LCD &
Viewfinder size
LCD screen
might not play such a significant role in deciding a camera, but definitely the
view finder size is. You have to frame your photograph by looking it through
the view finder only and you have to comfortable in it. So if you are comparing
between available options, then go for the DSLR with a bigger viewfinder size.
8. Memory card
You will
need to click many pictures and hence would definitely need lot of space in
your camera to store them. Do check the memory card size before buying your
camera and if you are comparing between various options, go for the one which
gives you bigger memory card (provided you have already compared other
features).
Size of
memory card is one of the features to be checked, but it should not be the
distinctive feature to buy a camera. Even if your camera does not give you a
memory card big enough, you can always buy extra memory cards, which are not
very costly.
9. Weight
You are not
going to keep your DSLR in your drawing room as a piece of display, rather you
have to carry it along with you to many places, not just in your bag but most
of the time around your neck or in your hand. So, do check the weight of the
camera before buying and while comparing, go for the lightweight one.
10. Power
One more ‘to
be checked’ feature before buying your camera. Again, if it doesn't give you
enough power backup, it can be compensated by carrying extra batteries.
Follow us for Photography tips, techniques and tutorials.
Follow us for Photography tips, techniques and tutorials.
Subscribe to:
Comments (Atom)
.jpg)


